
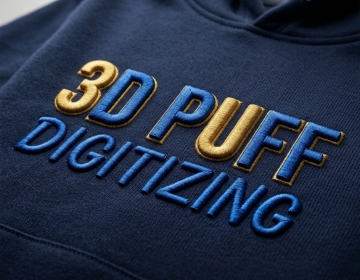
3D Puff Digitizing Services
3D Puff Digitizing Services: Raised Embroidery That Stands Out
Most cap logos lie flat. They stitch into the fabric and sit level with the surface. That's fine for simple placement work. But when a brand wants its logo to have real presence on a structured cap raised edges, visible depth, a look that reads from across the room flat digitizing does not cut it. That's exactly what 3D puff digitizing is built to solve.
The technique uses foam placed under satin stitches to push the design up off the fabric surface. Done right, it produces clean raised lettering and bold shapes that hold their form after washing. Done wrong, the foam shows at the edges, the stitches split or the design sinks back into the cap. The difference between those two outcomes is the quality of the digitizing file. USA Digitizing Pro has built 3D puff stitch files for apparel brands and cap decorators across the USA since 2015. Every file is hand built, not auto generated.
Quick Answer at a Glance
Here is everything you need to know about this technique and the service at a glance:
| Question | Answer |
|---|---|
| What is 3D puff digitizing? | Building a stitch file where foam sits under satin stitches to create a raised, dimensional design |
| What garments work best? | Structured caps, trucker hats, snapbacks, jackets and bags |
| Best for which designs? | Bold lettering, simple logos and geometric shapes fine detail and small text do not transfer well |
| Foam thickness? | Typically 3mm to 6mm depending on design height and cap structure |
| Turnaround? | Standard 2 to 4 hours |
| Quality guarantee? | Yes money back on quality issues |
| Contact | +1 (830) 321 7832 | sales@usadigitizingpro.com |
What 3D Puff Digitizing Is
3D puff digitizing: the process of creating a machine embroidery file specifically designed to stitch over a piece of foam, lifting the design above the fabric surface.
Standard embroidery files run stitches flat onto a garment. A puff file works differently. The machine pauses after the outline pass, foam is placed inside the stitched border and then the machine continues to satin stitch over the top of the foam. The stitches lock the foam down, trim it at the edges and leave a clean raised shape once the excess foam is torn away.
The file has to be built with this process in mind from the start. Stitch angle, density, column width, underlay method and end cap placement are all set differently for puff work compared to flat embroidery. That's why you can not take a regular digitized logo and run it over foam. You need a file built for it. For a full breakdown of the technical steps involved, see the 3D puff digitizing tips blog on the USA Digitizing Pro site.
How the Process Works Step by Step
Here is the full production sequence from artwork submission to finished cap:
- Send your logo file (PNG, JPEG, PDF, AI or EPS) along with the target placement size and cap style (structured, trucker, snapback, etc.).
- The digitizer reviews the artwork for puff suitability. Bold shapes and clean letterforms work well. Fine details and small text are flagged for simplification.
- The outline run is digitized first. This creates the border the foam will sit inside.
- A stop command is inserted in the file so the machine pauses for foam placement.
- Running stitches are added to hold the foam in position once placed.
- Satin columns are digitized to cover the foam. Column width, density (typically around 0.2mm per line) and angle are set for clean puff coverage.
- End caps are added to open column ends so the foam is fully enclosed and won't pull out.
- The finished file is delivered in your required format (DST, PES, JEF, VIP, VP3 or others) within 2 to 4 hours.
3D Puff vs Flat Embroidery: What Actually Changes
Both techniques produce embroidered designs. The difference is in how the file is built and what the result looks like on fabric.
| Factor | Flat Embroidery | 3D Puff Embroidery |
|---|---|---|
| Design sits | Flush with fabric surface | Raised above fabric surface |
| Uses foam? | No | Yes urethane or similar foam |
| Stitch type | Fill, satin, run (mixed) | Satin over foam primarily |
| Fine text? | Works at smaller sizes | Needs bolder letterforms, 6mm min height |
| Best garments | Polos, jackets, patches, most fabric | Structured caps, hard front hats |
| Visual effect | Clean, professional, low profile | Bold, dimensional, high visibility |
Which Designs Work and Which Do Not
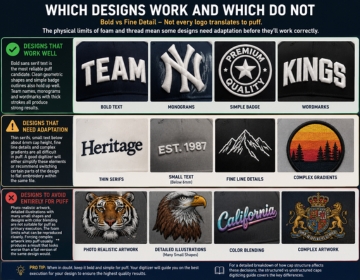
Not every logo translates to puff. The physical limits of foam and thread mean some designs need adaptation before they'll work correctly.
Designs That Work Well
Bold sans serif text is the most reliable puff candidate. Clean geometric shapes and simple badge outlines also hold up well. Team names, monograms and wordmarks with thick strokes all produce strong results. The key is that each shape in the design has enough column width for the foam to sit inside without the stitches crowding together.
Designs That Need Adaptation
Thin serifs, small text below about 6mm cap height, fine line details and complex gradients are all difficult in puff. A good digitizer will either simplify these elements or recommend switching certain parts of the design to flat embroidery within the same file. (You've probably seen this on caps where the main word is puffed but a tagline underneath runs flat. That's an intentional file decision.)
Designs to Avoid Entirely for Puff
Photo realistic artwork, detailed illustrations with many small shapes and designs with color blending are not suitable for puff as primary execution. The foam limits what can be reproduced cleanly. Forcing complex artwork into puff usually produces a result that looks worse than a flat version of the same design would.
For a detailed breakdown of how cap structure affects these decisions, the structured vs unstructured caps digitizing guide covers the key differences.
The Technical Side: What Makes a Puff File Different
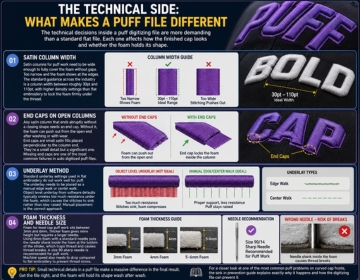
Here is the thing: the technical decisions inside a puff digitizing file are more demanding than a standard flat file. Each one affects how the finished cap looks and whether the foam holds its shape.
Satin Column Width
Satin columns for puff work need to be wide enough to fully cover the foam without gaps. Too narrow and the foam shows at the edges. The standard guidance across the industry is a column width between roughly 30pt and 110pt, with higher density settings than flat embroidery to lock the foam firmly under the thread.
End Caps on Open Columns
Any satin column that ends abruptly without a closing shape needs an end cap. Without it, the foam can push out from the open end after washing or with wear. End caps are small satin fills placed perpendicular to the column end. They're a small detail but a significant one. Missing end caps are one of the most common failures in auto digitized puff files.
Underlay Method
Standard underlay settings used in flat embroidery do not work well for puff. The underlay needs to be placed as a manual edge walk or center walk. Object level underlay from software defaults typically creates too much resistance under the foam, which causes the stitches to sink rather than stay raised. Manual placement is the correct approach.
Foam Thickness and Needle Size
Foam for most cap puff work sits between 3mm and 6mm. Thicker foam gives more height but requires a larger needle. Using 6mm foam with a standard needle puts the needle shank inside the foam at the bottom of the stroke, which traps thread and causes thread breaks. A size 90 sharp needle is recommended for puff work. Machine speed also needs to drop compared to flat embroidery to prevent thread stress.
For a closer look at one of the most common puff problems on curved cap fronts, the sink in prevention guide explains exactly why it happens and how the digitizing file can prevent it.
Foam Color Matching: The Detail Most Digitizers Skip
Not all puff issues come from the stitch file. Foam color is a production variable that affects the final result but rarely gets discussed on service pages.
If the foam color does not match the thread color stitching over it, any gap in coverage becomes visible as a contrasting stripe at the edge. On red thread over white foam, a thin line of white shows where the satin stitch does not fully wrap the foam edge. Using foam that matches or closely approximates the thread color hides these gaps.
This matters most on lighter thread colors and designs with narrow column widths. A professional digitizer will note the foam color requirement in the file delivery or in the order notes so the production floor knows which foam to use. Not always a digitizing problem. But a problem the digitizer should flag.
What Happens to Puff Embroidery After Washing
Buyers often ask about longevity. Puff embroidery holds up through normal machine washing provided a few conditions are met.
The foam used in commercial puff work is a closed cell urethane. Washed in cold or warm water it retains its shape and the stitches remain tight. Problems come from heat. High temperature machine drying compresses the foam permanently. Dry cleaning solvents can degrade the foam material. Ironing directly over puff stitches damages both the foam and the thread.
Caps with puff logos should be washed in cool water and air dried or dried on low heat. The satin stitches resist light abrasion well but the edges of the design are the most vulnerable point. A correctly digitized file with proper end caps and full foam coverage keeps those edges clean for significantly longer than a file with gaps.
What USA Digitizing Pro Delivers
The studio has produced puff files for cap decorators, promotional product companies, sports teams and workwear brands across the USA since 2015. Every file is built by hand by an experienced human digitizer. No auto digitizing tools are used at any stage of the process.
The delivery includes the finished stitch file in your chosen format, with end caps, manual underlay, correct density settings and a stop command inserted at the correct point for foam placement. Free edits are available after delivery if any adjustment is needed. The money back quality guarantee covers any file that does not sew correctly. For context on the broader range of cap work the studio handles, cap digitizing services gives a good overview of what goes into cap specific files.
Real Production Scenario
A Texas sports equipment retailer needed a team logo digitized for 180 structured caps. The design was a bold wordmark with a small icon above it. The wordmark was suited for puff. The icon had fine internal lines that wouldn't hold up in foam.
The digitizer split the file: the wordmark was built as a full puff element with satin columns and end caps on all open letter ends. The icon above it was digitized flat with standard fill stitches. The machine paused after the flat icon section for foam placement on the wordmark, then continued.
All 180 caps ran without thread breaks. The flat icon and raised wordmark produced a finished cap with clear visual contrast between the two elements. That two technique approach is something standard providers rarely offer. The file came back the same day.
Common 3D Puff Problems and What Causes Them
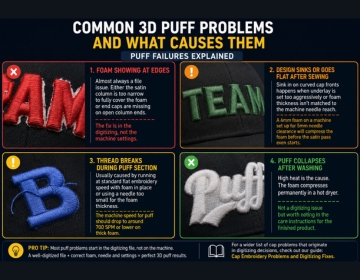
Foam Showing at Edges
Almost always a file issue. Either the satin column is too narrow to fully cover the foam or end caps are missing on open column ends. The fix is in the digitizing, not the machine settings.
Design Sinks or Goes Flat After Sewing
Sink in on curved cap fronts happens when underlay is set too aggressively or foam thickness isn't matched to the machine needle reach. A 6mm foam on a machine set up for 5mm needle clearance will compress the foam before the satin pass even starts.
Thread Breaks During Puff Section
Usually caused by running at standard flat embroidery speed with foam in place or using a needle too small for the foam thickness. The machine speed for puff should drop to around 700 SPM or lower on thick foam. For a wider list of cap problems that originate in digitizing decisions, cap embroidery problems and digitizing fixes covers the full range.
Puff Collapses After Washing
High heat is the cause. The foam compresses permanently in a hot dryer. Not a digitizing issue but worth noting in the care instructions for the finished product.
File Formats
USA Digitizing Pro delivers puff files in DST, PES, JEF, VIP, VP3, HUS, EMB and other standard formats. If you need a format not listed here, mention the machine brand in your order and the team will match it. To see output quality before ordering, browse the portfolio for examples of cap and puff work.
To place an order, email the artwork to sales@usadigitizingpro.com with the size, placement and cap style. The team is reachable by phone at +1 (830) 321 7832. The studio is located at 23531 Baker Hill Drive, Richmond, Texas 77469.
Start Your 3D Puff Digitizing Order
3D puff digitizing produces raised, dimensional embroidery that flat files simply can not replicate. Getting it right comes down to the file correct column widths, proper underlay, end caps on every open edge and foam thickness matched to the design. USA Digitizing Pro builds every puff file by hand to those standards, backed by a money back quality guarantee.