
Sleeve Embroidery Digitizing Services
Sleeve Embroidery Digitizing Services: Clean Arm Placement for Every Garment
Sleeve placement is the detail that separates a basic embroidered garment from a fully branded one. A jacket with a chest logo is standard. A jacket with a matching sleeve logo on the left arm becomes a complete uniform. Sports jerseys carry player numbers and team marks on the sleeve. Workwear programs often run company names or division identifiers on the upper arm. Getting sleeve embroidery digitizing right is what makes those placements look intentional rather than afterthought.
USA Digitizing Pro has built sleeve stitch files for sports brands, workwear programs and apparel decorators across the USA since 2015. Every file is hand built. Starting at $15 for designs under 5 inches, with a 2 to 4 hour turnaround and a money back quality guarantee. View finished sleeve work and other completed files at the portfolio before ordering.
Quick Answer
| Question | Answer |
|---|---|
| What is sleeve embroidery digitizing? | Building a stitch file optimized for logo placement on the upper or lower sleeve of a shirt, jacket or jersey |
| Standard sleeve logo size? | 2 to 4 inches wide on upper sleeve, band/cuff logos typically 1 to 3 inches |
| Left or right sleeve? | Left sleeve is industry standard for logos; right sleeve for numbers or secondary marks |
| Starting price? | $15 for designs under 5"; $25 for designs above 5" |
| Turnaround? | 2 to 4 hours standard |
| Common garments? | Work jackets, varsity jackets, sports jerseys, polo shirts, hoodies, uniform shirts |
| Quality guarantee? | Yes money back on quality issues |
| Contact | +1 (830) 321 7832 | sales@usadigitizingpro.com |
What Sleeve Embroidery Digitizing Is
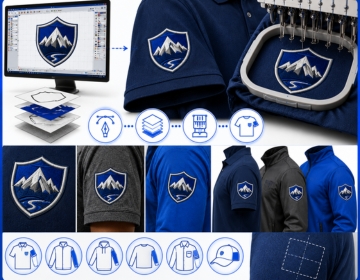
Sleeve embroidery digitizing: building a machine stitch file where a logo, text element or number is mapped specifically for placement on the sleeve of a garment.
A sleeve is a curved, tubular surface. The embroidery machine wraps around it differently from a flat chest panel. Hooping on a sleeve creates tension across a surface that curves away from the needle path. A file built for a flat garment panel does not account for this. Thread paths that run cleanly on a flat surface can pull or distort when the same file is run on a curved sleeve without adjustments.
Sleeve files need pull compensation tuned for the sleeve diameter, stitch direction optimized for the curved surface and correct sizing for the narrower print area compared to a chest or back placement. Get these right and the logo sits clean and flat regardless of the sleeve curve.
Left Sleeve vs Right Sleeve: Industry Standards
Left and right sleeve carry different visual weight and serve different branding functions. Most programs follow consistent conventions for which goes where.
Left Sleeve: Primary Logo Position
The left sleeve is the dominant arm for brand marks. Company logos, team crests and organizational identifiers almost always sit on the left upper sleeve. When a customer faces you, the left sleeve sits forward and catches the eye first. That's the visibility reason. The standard placement is centered on the upper arm between the shoulder seam and the elbow, typically 1 to 2 inches below the shoulder seam.
Right Sleeve: Secondary Marks
The right sleeve handles secondary elements. Player numbers on sports jerseys run on the right sleeve. Season years, division names or secondary brand marks on a workwear jacket often go right. A co branding arrangement where a client logo appears alongside the decorator's brand typically puts the client logo on the left and the secondary mark on the right.
Matching Left and Right in the Same File
Some programs run both arms simultaneously. A sports jersey might carry the team crest left and a player number right. These are digitized as separate files sized and positioned independently for each sleeve. The left vs right sleeve positioning guide covers the standard measurements and offset rules for both placements in more detail.
Sleeve Placement Types and Their File Requirements
Not all sleeve logos sit in the same place or face the same direction. Each placement variant has specific digitizing considerations.
Upper Sleeve Logo
The most common placement. The logo sits on the upper arm, horizontal and centered. The file is built as a standard flat design with pull compensation adjusted for the sleeve tube diameter. This is the default sleeve file most workwear and sports programs use.
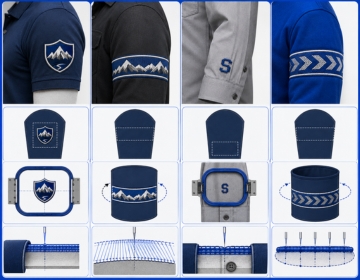
Wraparound Sleeve Design
Some designs wrap around the circumference of the sleeve. A stripe, band text or partial wrap pattern has to be digitized with the stitch direction following the wrap angle rather than running flat. These files need more planning than a standard upper sleeve logo because the design has to read correctly from multiple viewing angles as the arm moves.
Cuff and Lower Sleeve
Cuff placement runs close to the wrist. The fabric at the cuff is usually more stable but the available embroidery area is narrower. Text at the cuff a name, title or short brand message needs to be sized for the 2 to 3 inch horizontal space typical on a shirt or jacket cuff. The file also needs to account for button plackets on dress shirts and avoid stitching over them.
Sleeve Band Text
Continuous text running around the full sleeve circumference is a specialist file. It requires the design to be built as a segmented arc so the machine can complete each section without the hoop moving the garment during sewing. Most standard production shops do not attempt sleeve band text. The file requires careful testing on the target garment before a full production run.
Garment Types and How Sleeve Fabric Affects the File
The sleeve material changes the file the same way any other embroidery placement does. Different fabrics behave differently under needle pressure.
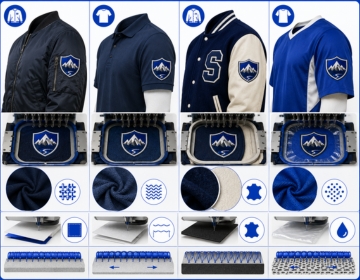
Work and Bomber Jackets
Jacket sleeves are usually the most stable surface for sleeve embroidery. Woven outer shells hold shape well and do not stretch under the needle. Pull compensation is lower. Density can be standard. Backing stabilizer is still needed most jacket sleeves require a cut away backing rather than a tear away because the fabric is too heavy for the tear away to stabilize fully.
Polo and Dress Shirt Sleeves
Polo sleeves are knit and stretch in multiple directions. The same pull compensation adjustments needed for a left chest logo on a polo apply here. The sleeve diameter on a polo is smaller than a jacket sleeve, which increases the curve stress on the design. Underlay on polo sleeves is important without it the knit fabric pulls up under fill stitches and the design shrinks.
Varsity and Letterman Jackets
Wool body with leather sleeves is the classic varsity construction. Leather sleeves require a completely different approach. Leather is non woven, does not breathe and holes from needles do not close after sewing. Test stitching before a full run is non negotiable on leather. Stitch density must be lower than on fabric to avoid perforating the leather surface excessively. Not every production shop handles leather confirm this before ordering.
Sports Jerseys and Performance Fabric
Moisture wicking and performance mesh fabrics have open weaves that shift under the hoop. These materials need water soluble topping placed over the design area before stitching so the needle does not push through the mesh holes rather than penetrating the fabric. The digitizing file for these garments also benefits from slightly shorter stitch lengths to prevent the thread from bridging mesh holes.
For brands also running chest logos alongside sleeve work, the left chest digitizing service covers the chest specific file requirements that differ from sleeve placement.
What Makes a Sleeve Design Difficult to Digitize
Vertical Text on a Horizontal Surface
Some sleeve designs run text vertically up the arm. This requires the stitch path to run at 90 degrees to the standard horizontal direction. It's not technically complicated but the file has to be explicitly built this way. Auto digitizing tools do not always handle rotated text paths correctly. A human digitizer sets this deliberately.
Number Blocks on Sports Jerseys
Player numbers on sports jerseys are typically run as fill stitches at 2 to 4 inches tall on the upper sleeve. The challenge is getting clean edges on rounded numeral shapes and keeping fill density consistent across large blocks of a single color. Inconsistent density produces a mottled appearance on the finished number.
Very Small Logos on Narrow Sleeves
Some uniform programs put logos on the sleeve of a fitted shirt or compression garment. The sleeve diameter is narrow and the usable flat area for hooping is small. At those dimensions, detail in the logo has to be simplified more aggressively than it would be at the same size on a chest panel because the curved surface compresses the design further.
Hooping a Sleeve: What the Production Team Needs to Know
A correctly digitized file still fails on the production floor if the sleeve isn't hooped correctly. This is something most digitizing service pages skip entirely but it affects every buyer running production.
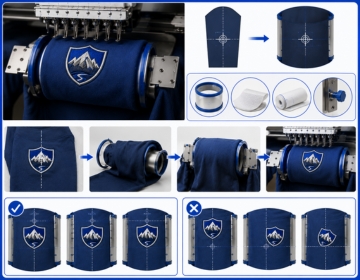
Sleeve hooping requires a cylindrical or tubular hoop that the sleeve slides over rather than a standard flat hoop frame. The hoop secures the sleeve fabric tightly around it is circumference. If the fabric slips or loosens during sewing the design migrates and the finished placement is off center.
The digitizer can help by building the file with the centering reference in the delivery notes. The most common issue on production runs is the operator centering the hoop on the sleeve seam rather than on the center of the flat panel. These are two different points on most garments. USA Digitizing Pro includes placement guidance notes with complex orders. Mention your production setup when you order and the team will flag any alignment details specific to your garment.
Running Sleeve and Chest Logos as Part of a Full Uniform Program
Most sleeve digitizing orders do not come in isolation. A full uniform program covers chest, sleeves and sometimes back placement on the same garment. Each placement has different file requirements. Running the same file across all positions produces inconsistent results.
The truth is that a well planned brief reduces costs and turnaround time significantly. Instead of ordering files one position at a time and going back for adjustments on each, brief the complete program upfront. Send the garment list, all placement positions and the size for each. The digitizer builds all files in sequence with consistent pull compensation and stitch settings across the range. Output is consistent. Reorders are clean.
For programs that also include cap placement, cap digitizing covers how cap specific requirements differ from flat garment work. And for full stitch count context across placement sizes, the logo digitizing process overview explains how complexity affects file pricing and delivery time.
File Formats
USA Digitizing Pro delivers sleeve files in DST, PES, JEF, VIP, VP3, HUS, EMB and other standard formats. Mention the machine brand in your order if you're unsure which format applies.
Get Your Sleeve Embroidery Digitizing File and How to Order
Sleeve embroidery digitizing builds the stitch file your machine needs to place a clean logo, mark or number on any sleeve surface. USA Digitizing Pro builds every file by hand pull compensation set for the sleeve diameter, stitch direction correct for the placement angle and density matched to the fabric. Starting at $15 for designs under 5 inches with a 2 to 4 hour turnaround.
To order, send the artwork with the following details:
- Target size in inches.
- Sleeve position: left upper, right upper, cuff or other.
- Garment type and sleeve material.
- Whether the design is a logo, number, text band or wraparound.
- Required output format.
The studio is at 23531 Baker Hill Drive, Richmond, Texas 77469. Free edits are included if any adjustment is needed after delivery. For an overview of all placement services available, see the full services list. To see sleeve work alongside other completed files, the portfolio has current production examples.