
Left Chest Digitizing Services
Left Chest Digitizing Services: Sharp Logo Embroidery on Every Shirt
The left chest is the most watched spot on any uniform or workwear shirt. Placed at roughly the heart position, it's where a customer's eye lands within the first two seconds of seeing the garment. A logo that stitches cleanly there projects professionalism. A logo that pulls, blurs or rides crooked on a polo shirt does the opposite. Left chest digitizing is what decides which outcome you get.
USA Digitizing Pro has built left chest stitch files for apparel decorators, workwear brands and promotional suppliers across the USA since 2015. Every file is hand built by an experienced digitizer no automated software handles these. Starting at $15 for designs under 5 inches, with a 2 to 4 hour turnaround and a money back quality guarantee. Browse finished work at the portfolio before placing your order.
Quick Answer
| Question | Answer |
|---|---|
| What is left chest digitizing? | Building a machine embroidery stitch file optimized for logo placement on the left chest area of a shirt polo or jacket |
| Standard size range? | 3 inches to 4.5 inches wide most corporate logos land at 3.5" to 4" |
| Starting price? | $15 for designs under 5"; $25 for designs above 5" |
| Turnaround? | 2 to 4 hours standard |
| Best garments? | Polos, dress shirts button downs, work jackets, hoodies, vests |
| Formats delivered? | DST, PES, JEF, VIP, VP3, HUS, EMB and others |
| Quality guarantee? | Yes money back on quality issues |
| Contact | +1 (830) 321 7832 | sales@usadigitizingpro.com |
What Left Chest Digitizing Is
Left chest digitizing: building a stitch file where the logo is sized, simplified and mapped specifically for embroidery on the left chest panel of a garment.
This is more specific than general logo digitizing. At 3.5 to 4 inches wide, details that look sharp on a screen or on a business card compress into thread. Thin lines close together become a solid block. Fine serif text becomes unreadable. A digitizer working at this scale makes active decisions which elements survive at this size, which get simplified, what stitch type handles each shape and how the thread path moves to keep the design clean.
Get those decisions wrong and the chest logo looks sloppy regardless of how good the original artwork is. Get them right and the logo reads cleanly at arm's length holds its shape after dozens of washes and represents the brand the way it should.
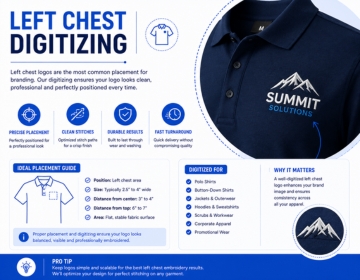
Left Chest Placement: Where and How Big
Placement isn't just a measurement. The position and size of a chest logo change how the garment reads and what the brand communicates.
Standard Left Chest Position
The standard left chest placement sits 3 to 4 inches down from the left shoulder seam and 3 to 4 inches in from the left side seam. That lands the logo directly above the left breast pocket on a dress shirt or at the heart position on a polo. This is where customers instinctively look for a company identity.
Size Guidelines by Garment
The garment type changes the appropriate logo size. Polos and button down shirts typically carry logos between 3 and 4.5 inches wide. Work jackets can accommodate slightly larger logos up to 5 inches because the chest panel is broader. T shirts and hoodies sometimes run larger logos at center chest instead. Left chest on a t shirt tends to stay at the 3 to 4 inch range unless the brand specifically needs a larger statement logo.
Why Size Must Be Confirmed Before Digitizing
A file built for 3.5 inches is not the same as one built for 4.5 inches. Stitch counts, column widths and text simplification decisions all tie to the final size. Scaling a file that was built for one size to another produces a mathematically resized file, not a rebuilt one. The quality difference is real. Confirm the exact output size before the digitizer starts.
The Left Chest Digitizing Process
Here is how a left chest file is built at USA Digitizing Pro from artwork to delivery:
- Submit the logo file (PNG, JPEG, PDF, AI or EPS) with the target size, garment type and fabric (polo pique, woven shirt, jacket, hoodie).
- The digitizer reviews the artwork at the target size. Fine details, small text and thin strokes are flagged for simplification.
- Underlay is set based on the fabric type. Knit polo fabric needs different compensation from a woven dress shirt.
- Fill and satin stitch sections are mapped. Text elements are built with satin columns sized correctly for readability at the output dimensions.
- Pull compensation is added. All fabrics stretch slightly under needle pressure. Compensation stitches keep the design dimensions stable after sewing.
- Color sequence is ordered to reduce thread changes and minimize jump stitches across the design.
- The file is checked for path logic, trim placement and correct start/stop positioning for the left chest placement.
- Delivered in your requested format within 2 to 4 hours. Free edits available if any adjustment is needed.
Fabric Types and How They Affect the File
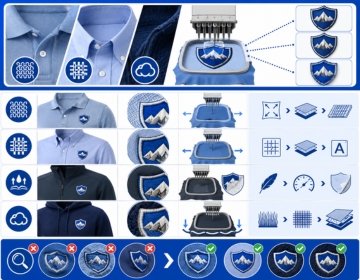
The same logo digitized for a woven dress shirt will not sew correctly on a knit polo without adjustment. Fabric behavior under embroidery is one of the factors most buyers do not think about but experienced digitizers always do.
Pique Knit Polo
The most common left chest garment. Pique knit stretches in all directions. Pull compensation settings need to be higher than on woven fabrics. Underlay is critical to stabilize the knit surface before the top stitches go in. Skip the underlay on polo fabric and the design pulls the weave, shrinking the finished dimensions.
Woven Dress and Oxford Shirts
More stable than knit. Woven fabric resists needle penetration more evenly, so density settings can be tighter and pull compensation values are lower. Fine text holds better on woven fabrics at smaller sizes.
Soft Shell and Performance Jackets
Performance fabric and soft shell material can be delicate. Higher stitch density cuts into the fabric over time with wear and washing. Density is set conservatively on these materials. A backing stabilizer is also recommended for production work on performance fabrics.
Hoodie and Fleece
Fleece has the most give. The surface is also textured, which affects how satin stitches read. Density needs to be higher than on woven materials to prevent the stitch columns from sinking into the fleece pile. Underlay is set as a heavier edge walk on fleece to flatten the pile before the design stitches over it.
For a direct look at the most common problems that show up when left chest digitizing isn't set up for the fabric, left chest embroidery problems and fixes covers each failure mode with the file level solution.
What Makes a Left Chest Logo Hard to Digitize
Not every logo digitizes cleanly at left chest sizes. Some designs need more work. Knowing what makes a design difficult helps set accurate expectations.
Fine Text and Small Lettering
Text below about 4mm cap height at the output size is the most common problem. Thin letter strokes merge under the needle. The fix is either enlarging the text to a minimum sew able size or switching very small text to a run stitch instead of satin. Neither is a compromise on quality they're the correct solutions for the constraint.
Taglines and Multi Line Text
Corporate logos with a main name plus a tagline beneath are standard in workwear. The tagline is almost always smaller than the main text. At 3.5 inch total width, a two line text arrangement compresses the tagline to sizes that challenge clean stitching. The digitizer will either increase the tagline size slightly or simplify the letterforms to maintain readability. (You've probably seen logos where the tagline looks slightly bolder in embroidery than in print. That's intentional.)
Logos with Gradients or Shadows
Embroidery does not reproduce gradients. Color transitions are simulated with stitch angle changes and blending techniques but the result is always a simplification. At left chest sizes, gradients rarely survive the translation. A digitizer converts these elements to solid color fills with strategic stitch direction to suggest depth.
Complex Icons and Fine Line Art
Detail heavy icons next to text in a chest logo often need to be reduced to their core shapes. A detailed crest or badge illustration that works at 8 inches falls apart at 3.5 inches. The choice is either to simplify the icon or, in some cases, drop detailed interior elements and keep the outer silhouette.
Hooping and Alignment: The Production Step That Follows Digitizing
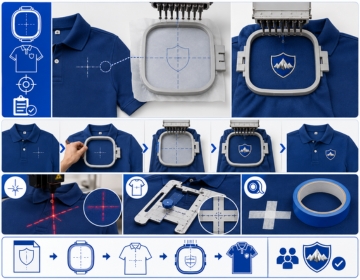
A correctly built digitizing file still produces a bad result if the garment is hooped or positioned incorrectly. This is a gap most service only pages do not address. But it matters for buyers running production.
Left chest logos need to be cantered consistently across a production run. The standard method is to mark the canter of the design on the hoop backing and align it to the chest placement mark on the garment before clamping. Inconsistent hooping produces misaligned logos that sit too high, too low or tilted on finished pieces.
Some professional decorators use a laser positioning guide or a placement tool to hit the same spot on every garment. Others use a backing tape mark system. Either method works. The key point is that the file the digitizer builds should include a cantering mark or the digitizer should confirm the canter reference point in the delivery notes so the operator knows where to align the hoop.
USA Digitizing Pro includes placement guidance in order notes where needed. If your shop is running a large production run on a new shirt style, mention it when you order and the team can note the cantering reference in the file delivery.
Running Left Chest Logos Across Multiple Garment Types
A single brand logo often needs to run on five or six different garment styles across a uniform program. Polos, shirts, jackets, vests and hoodies all have different chest panel widths, different fabric behaviours and different stabilizer requirements.
Plain and simple: one stitch file does not cover all of these correctly. The polo file needs higher pull compensation than the woven shirt file. The fleece hoodie file needs higher density than the polo file. Running the same DST across all garments saves time in the order process but produces inconsistent results across the range.
The correct approach for a multi garment program is to brief the digitizer on the full garment list at the start. A skilled digitizer will either build a single file with settings that work acceptably across all materials or flag where separate files are needed for the highest risk fabrics. USA Digitizing Pro handles both approaches. If you are running a five style program, send the full brief upfront and the team will advise on file count.
For brands that also need sleeve placement alongside chest work, sleeve digitizing placement standards covers the positioning rules and file differences for that placement.
Left Chest vs Left Chest Patch: Which One to Order
Some buyers are unsure whether to order a direct embroidery file or a patch file for chest placement. The difference matters.
Direct left chest embroidery stitches straight through the garment fabric onto a backing stabilizer. The design becomes part of the shirt. It's permanent, sits flush with the fabric and is the standard method for polos, dress shirts and woven jackets.
A left chest patch is embroidered onto a separate backing material, cut out and then applied to the garment. It makes sense when the garment fabric is too delicate for direct embroidery, when the same logo needs to go on many different garment types without re hooping or when removability is needed. More detail on that decision is covered in the patch chest digitizing overview.
Who Orders Left Chest Digitizing
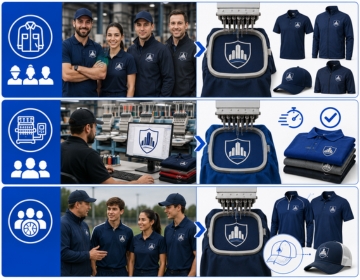
Workwear and uniform programs represent the largest share of orders. A regional facilities company kitting out 200 staff members needs consistent left chest logos across every polo and jacket in the program. The file runs hundreds or thousands of times. Quality and reliability matter at that scale.
Embroidery shops and decorators that take client work are the other major segment. They receive artwork from clients, need a production ready file fast and can not afford re hooping events or rejected pieces. Fast turnaround and a file that runs clean the first time are the two things they need most.
Sports teams order left chest files for coaching jackets, warmup shirts and staff polo programs. If the same logo also needs to go on caps, cap digitizing covers how cap specific file requirements differ from flat chest work.
Pricing Left Chest Digitizing File
USA Digitizing Pro prices left chest digitizing at $15 for designs under 5 inches. Designs above 5 inches start at $25. Most corporate and workwear left chest logos fall under 5 inches.
For an overview of all placement and decoration services, see the full services list. To see left chest work alongside other completed files, the portfolio has current examples.
Get Your Left Chest Digitizing File and Order
Left chest digitizing produces the file your machine needs to place a clean, professional logo on every shirt in a production run. USA Digitizing Pro builds each file by hand correct fabric compensation, readable text at production size and a stitch path that runs without thread breaks. Starting at $15 for designs under 5 inches with a 2 to 4 hour turnaround.
To order your logo file, the target size, the garment type and your required output format. The team is available at +1 (830) 321 7832. The studio is at 23531 Baker Hill Drive, Richmond, Texas 77469. Free edits are included if any adjustment is needed after delivery. The money back guarantee covers any file that does not sew correctly.