

Types of Embroidery Stitches: The Complete Machine Guide (2026)
Published September 11, 2026 | By USA Digitizing Pro Team
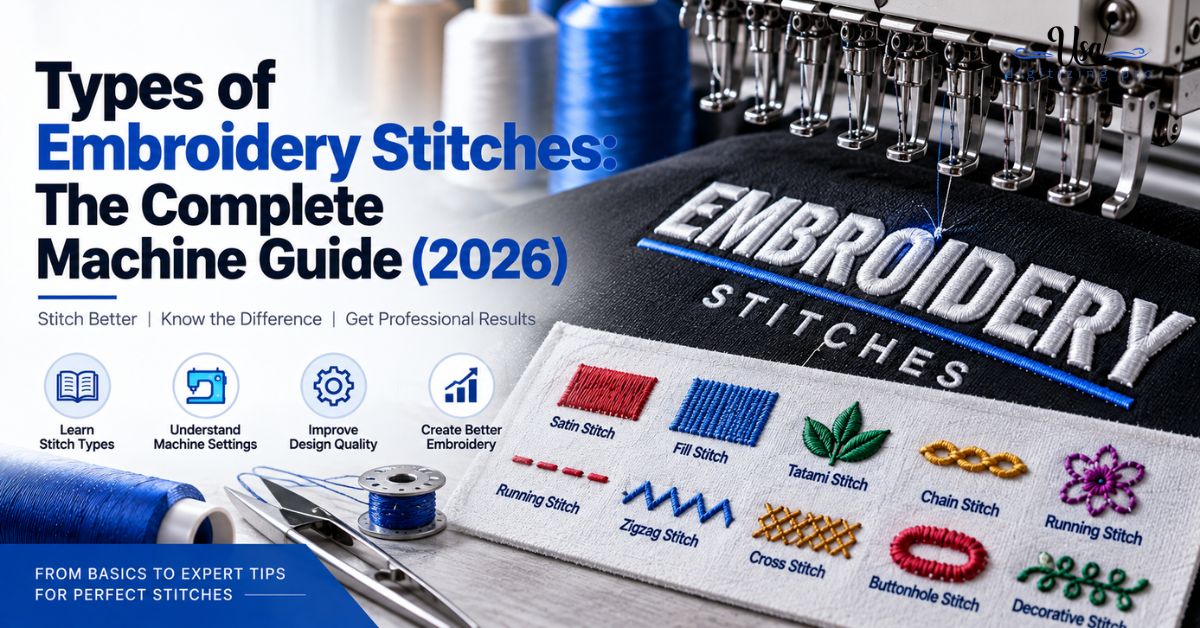
Ask what stitch types exist in machine embroidery and almost every answer names three: run, satin, and fill. Those three are the structural backbone, and they are nowhere near the whole list. Fill alone is a family with half a dozen distinct members that produce completely different textures, and every file you have ever stitched also contains utility stitches nobody names. Here is the full vocabulary, organized into the three tiers that actually make sense of it.
Quick Answer at a Glance
| Tier | Stitches | What They Do |
|---|---|---|
| Structural | Run, satin, fill | Carry the visible design |
| Fill variants | Tatami, contour, motif, ripple, meander, embossed | Change texture and direction within filled areas |
| Utility | Underlay, lock stitches, connectors, jumps | Support and join, mostly invisible |
| Decorative | Bean stitch, doubled and tripled runs | Add weight or a hand-stitched look to lines |
Tier One: The Three Structural Stitches
These three carry the visible design and account for the large majority of any file’s stitch count. Everything else in this guide either supports them or is a variation on one of them.
Running Stitch
A running stitch is a single line of stitches following a path, the simplest thing an embroidery machine does. It handles outlines, fine linear detail, and travel between elements, and it uses fewer stitches than any other type by a wide margin. Most designs contain far more running stitch than the person looking at them realizes, because much of it is doing invisible work.
Satin Stitch
Satin lays stitches across the width of a column, producing a smooth slightly raised surface with a distinctive sheen. Mechanically it behaves like a very wide, very close zigzag. It is the standard for lettering and borders because nothing else produces edges that clean, and its only real constraint is width, since wide columns mean long individual stitches that snag. the stitch selection guide covers where those width limits sit.
Fill Stitch
Fill covers broad areas using many short stitches laid in rows. Because each individual stitch stays short no matter how large the area is, fill has no snagging problem and no practical size ceiling. It reads flatter and more textured than satin rather than glossy, which is exactly why lettering uses satin and backgrounds use fill.
Tier Two: The Fill Family
Here is where most guides stop short by treating fill as one thing. Fill is a category, and the variant chosen changes the texture, the direction the light catches, and how much the finished area reads as flat or shaped.
Tatami Fill
Tatami is the workhorse fill, laying rows of stitches in a brick-like offset pattern that produces a smooth, even surface. It gives consistent coverage without excessive bulk, which is why it handles backgrounds, large logo areas, and anything needing to look uniformly solid. When a source says fill without qualifying it, tatami is usually what they mean.
Contour Fill
Contour fill follows the outline of the shape it is filling, with rows curving to hug the perimeter rather than running straight across. Because the stitch direction follows the form, light catches differently across the area and produces a shaded, dimensional effect. It suits leaves, petals, and organic shapes where emphasising the curve is the point.
Motif Fill
Motif fill builds coverage from repeated running stitch shapes rather than solid rows, leaving deliberate space between the elements. One common style resembles the traditional Japanese sashiko look. It gives a lighter, more open, decorative texture and uses far fewer stitches than a solid fill covering the same area.
Ripple and Meander Fills
Ripple fill radiates its stitch pattern outward from a central point, producing concentric movement across the shape. Meander fill runs a looser, wandering pattern that mimics free-motion quilting. Both are texture choices rather than coverage choices, and both suit decorative work more than corporate logo reproduction.
Embossed Fill
Embossed fills manipulate stitch direction and spacing within a filled area to create the impression of a pattern pressed into the surface. The area reads as solid from a distance while carrying visible internal detail up close. Like the other decorative variants, it costs more digitizing time than plain tatami and rewards it only when the texture serves the design. how build quality shows in the finished stitch covers how fill quality is judged on a stitch-out.
Tier Three: The Utility Stitches
Every file contains these, and almost no guide names them. They do not appear in the finished design as decoration, yet they determine whether the visible stitching holds together at all.
1- Underlay
Underlay is a foundation layer stitched before the visible elements, anchoring the fabric and giving the top stitches something stable to sit on. Its forms include centre runs for narrow columns, edge walks for thin letters, and heavier patterns beneath large fills. Underlay type has to match both the element and the fabric, and applying one setting across a design is a common source of defects. the underlay settings explainer covers the main types and their uses.
2- Lock Stitches
Lock stitches are tiny securing stitches placed at the start and end of each stitching section to stop the thread pulling free. Without them, trimming a thread tail can unravel the section it belonged to. They are invisible in a finished design and immediately noticeable by their absence when stitching starts coming undone in the wash.
3- Connectors and Jump Stitches
Connectors carry the needle from one part of a design to the next. Where the software can hide them beneath later stitching, they disappear. Where it cannot, they become jump stitches that get trimmed, either automatically by the machine or by hand afterward. A well sequenced file minimizes them, and a poorly sequenced one leaves dozens of threads per garment for someone to clip.The settings behind common digitizing faults cover what poor pathing costs in production.
Decorative Variants Worth Knowing
Two variations on the running stitch come up often enough in commercial work to be worth naming separately, since both solve the same problem of a line needing more presence.
Bean Stitch
A bean stitch runs the needle back and forth along the same path, typically three times, building a raised line that resembles hand embroidery. It gives an outline noticeably more weight and dimension than a single run without moving to satin, which makes it useful where a satin column would be too wide for the design.
Doubled and Tripled Runs
Simpler than a bean stitch, a doubled or tripled run just retraces the same line to add visual weight. It is the standard answer for an outline that looks too thin as a single run but is still too narrow to work as satin, which is the awkward zone below roughly 1.5mm in width.
Matching Stitch Type to Design Element
Knowing the vocabulary matters most when it turns into a decision. This is how the types map onto the elements you actually encounter in commercial work.
| Design Element | Stitch Type | Notes |
|---|---|---|
| Lettering, any size | Satin | Small text under a quarter inch requires it |
| Thin outlines and detail lines | Run, bean, or doubled run | Choose by how much weight the line needs |
| Large solid areas | Tatami fill | Even coverage without bulk |
| Leaves, petals, organic shapes | Contour fill | Direction follows form for shading |
| Light decorative texture | Motif fill | Open pattern, far lower stitch count |
| Beneath every element | Underlay | Type matched to element and fabric |
Checking Stitch Choices on the Sample
Stitch type errors are visible on a physical stitch-out and invisible on a screen preview, which makes this check worth the few minutes it takes.
Inspection Checklist
- Confirm all lettering is satin rather than fill, especially at small sizes.
- Check narrow lines for bunching, which means satin was used where a run belonged.
- Look across fill areas for banding or mottling that suggests the wrong fill variant or spacing.
- On organic shapes, check whether the fill direction follows the form or cuts across it.
- Turn the garment over and count jumps to judge connector planning.
- Tug gently at section ends to confirm lock stitches are holding.
A Real Order, Broken Down
A Texas outdoor brand ordered a crest logo with a mountain silhouette, a banner, and small tagline text beneath it. The supplied file used tatami fill throughout, which made the mountain read as a flat grey block with no sense of form, and put the tagline in fill as well, which turned it into a smear. Rebuilding switched the mountain slopes to contour fill so the stitch direction followed the ridgelines and caught the light, kept tatami for the flat banner area where uniform coverage was right, and moved the tagline to satin. Same design, same colours, three different stitch decisions, and a completely different result. the stitch count estimator walkthrough covers how these choices affect the total count.
Who Builds These Files
USA Digitizing Pro selects stitch types element by element rather than applying one fill across a design, from its Texas studio since 2015. Pricing starts at $15 for designs under 5 inches, with a 2 to 4 hour turnaround and a money-back quality guarantee. Service details are on the logo embroidery digitizing page.
Frequently Asked Questions
Three structural types carry the design: running stitch for lines, satin for lettering and narrow columns, and fill for broad areas. Beyond those sit fill variants like tatami and contour, plus utility stitches including underlay, lock stitches, and connectors.
The standard fill variant, laying rows of stitches in a brick-like offset pattern for smooth, even coverage without excessive bulk. When someone says fill without qualifying it, tatami is usually what they mean.
Satin lays long stitches across a column’s width, giving a glossy raised finish suited to lettering. Fill uses many short stitches in rows to cover broad areas, reading flatter and more textured with no size limit.
Shapes where the curve is the point, like leaves, petals, and organic forms. The stitch rows follow the shape’s outline rather than running straight across, so light catches them differently and creates a shaded effect.
A running stitch that retraces the same path, typically three times, building a raised line resembling hand embroidery. It adds weight to an outline without needing to switch to satin.
A foundation layer stitched before the visible elements. It anchors the fabric and supports the top stitching, with the type, such as a centre run or an edge walk, matched to the element and the fabric.
Connector stitches carrying the needle between parts of a design where the software cannot hide them beneath later stitching. They get trimmed by the machine or by hand, and a well sequenced file keeps them to a minimum.
Small securing stitches at the start and end of each section that stop the thread pulling free. Without them, trimming a thread tail can unravel the stitching it belonged to.
Satin, always. Fill patterns cannot resolve at small sizes and turn lettering into an unreadable solid mass.
Pricing starts at $15 for designs under 5 inches, with larger or more complex designs quoted individually and a standard 2 to 4 hour turnaround.
The Vocabulary Is the Toolkit
Types of embroidery stitches come in three tiers rather than one list. Run, satin, and fill carry the visible design. The fill family, tatami through contour, motif, ripple, meander, and embossed, decides how a filled area reads. Underlay, lock stitches, and connectors hold the whole thing together without ever being seen. Knowing all three tiers is what turns a vague request into a specific one, and specific requests produce better files.
Follow Us

RELATED BLOGS
Exploring the Power of Vector Artwork: One File,.
Published September 11, 2026 | By USA Digitizing Pro Team Most business owners meet vector artwork the same way: a vendor rejects.
Vector Artwork for Stitching: The Preparation Rules 2026
Published September 21, 2026 | By USA Digitizing Pro Team A vector file that prints perfectly can still be the wrong shape.
9 COMMENTS
[…] All of it affects how long the design takes to run and how much hand finishing it needs afterward. the stitch types overview covers the utility stitches doing this […]
[…] on the finished garment, which is why it is decided individually rather than applied globally. the stitch types overview covers the full set […]
[…] rather than printed. It costs nothing in thread or machine time. It costs only the decision. the stitch types overview covers the fill variants that make direction control […]
[…] linear structure your digitizer plans around is inherited directly from a physical strip of paper. why stitch order matters covers the sequencing that structure […]
[…] so set the intended thickness before expanding, keeping satin columns above the practical minimum. the minimum width thresholds covers where those floors […]
[…] will hold as stitches. The result reads as the same handwriting with slightly more even weight. the minimum stitch width thresholds covers where those floors […]
[…] less and spreading wider. That reorganization is a digitizing decision, and it changes which stitch types a digitizer can use on the letters that survive the […]
[…] Digitizing sources describe this precisely: as a design sews toward the top of the cap, vertical lines can appear distorted as the cap moves. The upper region of the field is the least reliable place to put anything that depends on being straight. Long uprights, tall thin letters, and narrow columns all suffer there. Which stitch can hold those shapes at all is a separate constraint, set out in our reference on stitch types and their width limits. […]
[…] a Mac. This is the tier where the fine control over underlay settings built for cap panels and over stitch types and the widths they need is assumed rather than […]