

Vector Artwork for Screen Printing vs Embroidery: One File, Two Different Jobs 2026
Published July 11, 2026 | By USA Digitizing Pro Team
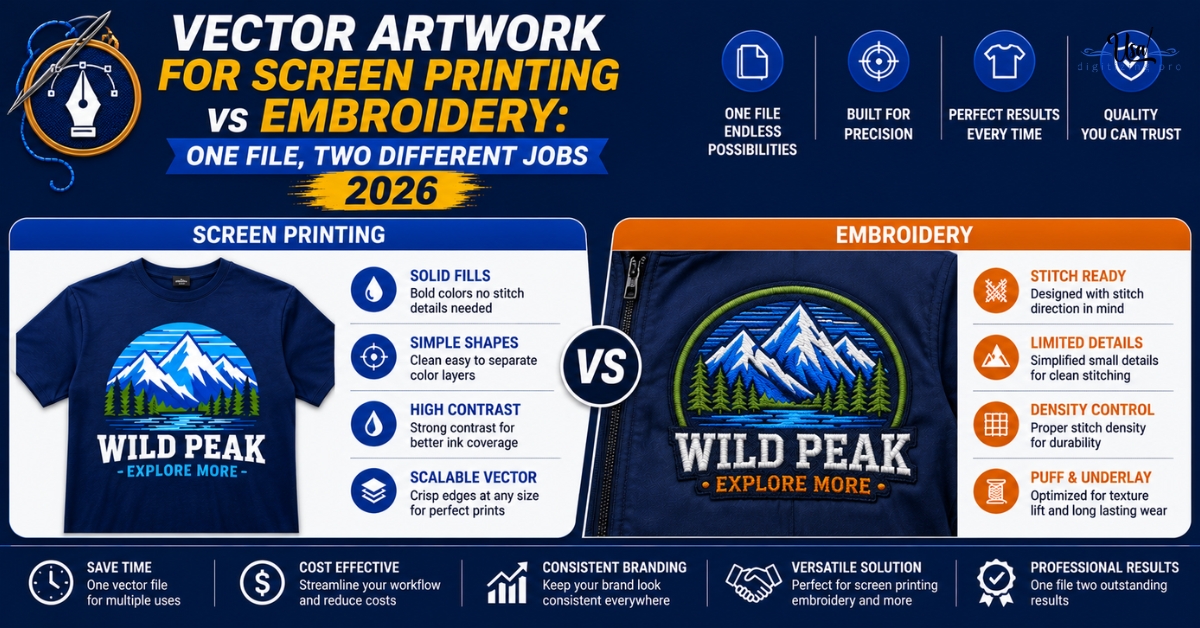
Ask a screen printer and an embroidery shop what they need from your artwork, and both will say vector. That answer hides a real difference. Vector artwork for screen printing vs embroidery starts from the same clean, scalable file type, but each production method does something completely different with it afterward. One separates it into ink screens. The other rebuilds it into a stitch path. Sending the same vector file to both without understanding that difference is how buyers end up with a print-ready logo that still needs extra work before a machine can stitch it.
Quick Answer at a Glance
Why Both Methods Ask for the Same File Type
Vector files store shapes as mathematical paths rather than pixels, which means they scale to any size without blurring or pixelating. That property matters to a screen printer separating a design into ink colors and to a digitizer tracing shapes into stitch paths, for the same underlying reason: clean edges. A blurry raster edge forces either process to guess where one color or one stitch element stops and another begins. For a closer look at what actually happens during that pixel-to-path conversion, the JPG to vector conversion walkthrough covers the manual tracing process both industries depend on.
What Screen Printing Actually Does With a Vector File
A screen printer uses the vector file to separate the design into individual ink colors, and each color becomes its own screen and its own film positive. The vector paths give the separator precise, unambiguous boundaries between colors, which is the entire reason vector is preferred over raster for this step. Once separated, the vector file’s job is essentially done. The screens themselves carry the design forward through the actual printing process.
What Embroidery Actually Does With a Vector File
This is the part buyers most often misunderstand. Embroidery digitizing doesn’t separate a vector file the way screen printing does. A digitizer opens the vector artwork as a visual reference and manually builds an entirely new file: a stitch path that tells an embroidery machine where the needle goes, what stitch type to use, and when to change thread colors. The vector file itself never touches the embroidery machine. It’s a guide the digitizer traces from, not a file the machine reads directly.
Why a Print-Ready Vector File Isn’t Automatically Embroidery-Ready
Here’s the gap that trips up a lot of buyers ordering artwork for a single logo destined for both a printed hoodie and an embroidered cap. A vector file clean enough for flawless screen printing separation can still contain fine lines, tight curves, or small text that won’t translate into embroidery at all, since thread has physical width and stitching has a minimum practical size that ink doesn’t share. A logo can be perfectly print-ready and still need real simplification before it’s genuinely embroidery-ready.
Side-by-Side: What Each Production Method Needs From the File
Why Ordering Both Outputs from the Same Master File Saves Money
A single, well-built master vector file can feed both a color separation for printing and a digitizing project for embroidery, since both processes start from the same clean source. Ordering the vector artwork once, with both end uses in mind, avoids paying twice for two separate art-cleanup passes on what’s ultimately the same logo. It also keeps the design consistent across a product line that includes both printed and embroidered items, since both start from an identical source shape rather than two independently recreated versions.
What to Tell Your Vector Artist Upfront
- State both intended end uses if the logo needs to work for print and embroidery.
- Flag any fine text or thin lines so the artist can note where embroidery-specific simplification will be needed later.
- Share Pantone codes if brand color accuracy matters for the printed version.
- Confirm you want a master file that can serve both processes, not a single-purpose file for only one.
- Ask for all standard formats (AI, EPS, PDF, SVG) in delivery so either production method can use the file without a second conversion.
A Real Order, Broken Down
A brewery in Colorado ordered a logo vectorized for a new product line, planning to print it on cans and embroider it on staff hats. The vector artist built a clean master file with the full detail level, including a thin hop-vine illustration wrapping around the brewery’s name.
The printed can artwork used the full detailed vine without issue, since ink has no minimum line width the way thread does. When the same file went to digitizing for the hat logo, the digitizer flagged the vine detail as too fine to hold at the 3-inch cap size, and built a simplified, bolder version of the vine specifically for the embroidered output while keeping the original detailed vector intact for print use. Both versions traced back to the same master file, keeping the brand consistent across both products.
Who Handles This Work
USA Digitizing Pro has produced vector artwork and embroidery digitizing from its Texas studio since 2015, understanding both what a screen printer needs from a file and what a digitizer needs to build from it. The team backs its work with a money-back quality guarantee.
Frequently Asked Questions
No. A printing press uses screens separated from the vector file. An embroidery machine uses an entirely separate stitch file built by a digitizer using the vector as a visual reference, not the vector file itself.
Print has no minimum practical line width, so fine detail reproduces cleanly in ink. Embroidery thread has physical width and a minimum stitch size, so the same fine detail that prints perfectly can blur or bridge together once stitched at a small scale.
Not necessarily. A single master vector file can serve both, though the digitizer will typically build a simplified version specifically for the embroidery output while the original detailed vector stays available for print use.
AI, EPS, PDF, and SVG all work as a starting point for either process. Neither production method uses these formats directly in the final output. Print uses separated screens; embroidery uses a converted stitch file.
Both benefit from fewer colors, but for different reasons. Screen printing adds a full screen and setup cost per color. Embroidery adds thread changes and machine stops per color, which slows production without necessarily adding to material cost the way an extra screen does.
Screen printing can approximate gradients through process color separation and halftone dots. Embroidery generally can’t reproduce a true gradient, since thread colors are discrete rather than blended, though skilled digitizers can approximate soft transitions using thread shading techniques.
The vector file serves as a reference, not a direct input. A digitizer rebuilds the design as a stitch path, and often needs to simplify fine detail, adjust letterforms, or modify shapes so the embroidery holds up at the target size, which print doesn’t require.
Vector isn’t strictly required, since a digitizer can trace from a clean raster image as well. Vector is preferred because its clean edges make tracing faster and more accurate, particularly for fine detail or small text.
The JPG would need to be converted to vector first, ideally as a single master file, before either production method can use it effectively. Skipping that step usually means each production method has to do its own cleanup separately, at extra cost.
Vectorizing first, with both intended uses in mind, is more efficient. It lets one clean master file inform both a print-ready separation and an embroidery-ready simplification, rather than starting the art process twice for two different outputs.
Getting One File to Work for Both Jobs
Vector artwork for screen printing vs embroidery starts from the same file type but ends up doing two different jobs. Print separates it into screens. Embroidery rebuilds it into a stitch path. Order a single clean master vector file with both end uses in mind, and let each production method adapt it as needed rather than starting from scratch twice. USA Digitizing Pro handles both vector artwork and embroidery digitizing from the same studio, backed by a money-back quality guarantee. Reach the team at sales@usadigitizingpro.com or +1 (830) 321-7832 for a free quote.

RELATED BLOGS
The Art Hidden Behind Embroidery Digitizing 2026
Published September 21, 2026 | By USA Digitizing Pro Team Two stitched logos can both be technically correct and one still looks.
3D Puff Embroidery Cost Per Design: What Drives.
Ask five digitizers what 3D puff embroidery costs per design and you'll get five different answers. That's not a scam. Puff pricing.
4 COMMENTS
[…] to be needed for promotional items or embroidery on dark garments, ask for that at the same time. the print versus embroidery artwork requirements covers the differences between those two […]
[…] web, and promotional products. It also serves as the cleanest possible source for digitizing. what each production method needs from vector covers the downstream […]
[…] ones, and the data does not support that framing. It is the largest single category in the mix. why embroidery holds up where printing does not covers the durability argument behind […]
[…] in either direction is costly, and it matters more than usual when the destination is thread, since what screen printing and embroidery each need differ sharply on this […]