

Applique vs Embroidery Digitizing Difference: What Changes Inside the File 2026
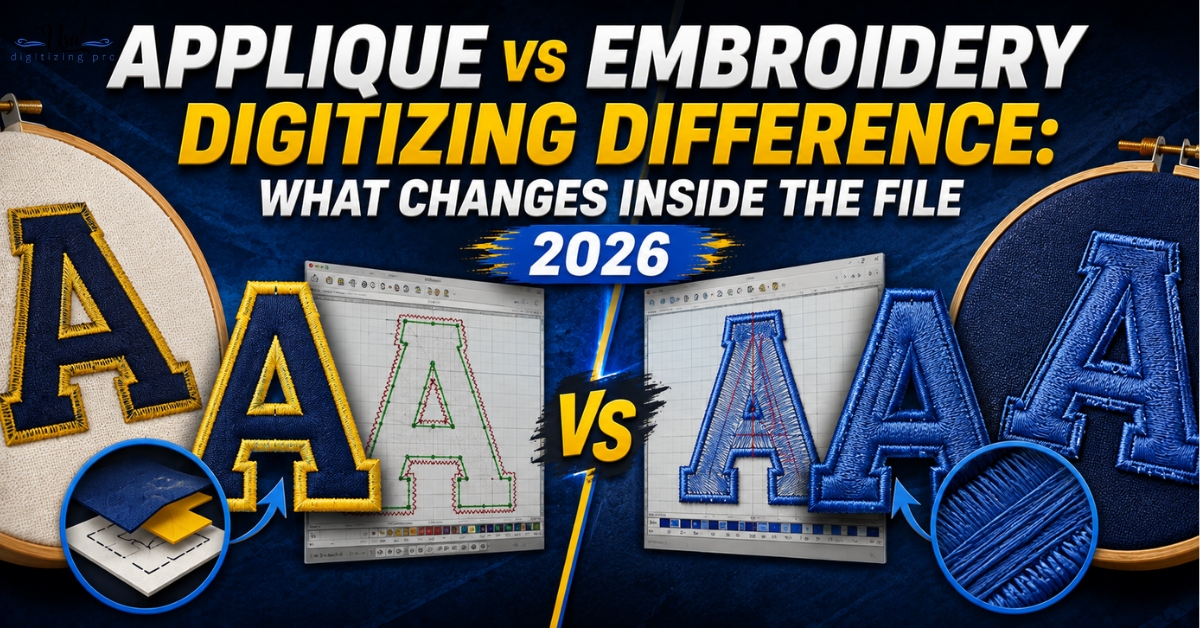
Send the same logo to two digitizers and ask one for embroidery and one for applique, and you’ll get back two completely different files. Same artwork. Same size. Same color count. The applique vs embroidery digitizing difference isn’t about which one looks fancier. It’s about how the machine builds the shape: with thread alone, or with fabric plus thread. That single choice changes the stitch count, the machine stops, and how the finished design feels on the garment. Here’s what actually changes inside the file when a digitizer picks one over the other.
Quick Answer at a Glance
What Each Term Actually Means
Embroidery digitizing: converting artwork into a stitch file where thread alone builds every visible shape, using fill, satin, and running stitches. Applique digitizing: converting artwork into a stitch file where a cut piece of fabric fills the main shape, held down and bordered by thread. Both start from the same kind of source artwork. Both end up as a machine-readable stitch file. What happens in between is where the difference lives.
A logo digitized as straight embroidery gets stitch instructions for every square millimeter of color. The same logo digitized as applique gets three separate stitch layers with two machine stops built in for manual fabric work. Neither approach is more advanced than the other. They solve different problems.
The Stitch File Differences That Matter
Four things change inside the file depending on which technique a digitizer builds toward. None of them are visible just from looking at the finished artwork on a screen.
Layer Count and Machine Stops
A standard embroidery file runs as one continuous sequence: underlay, fill, satin, done. An applique file needs a minimum of two machine stops. The first follows a placement stitch so an operator can lay fabric over the outline. The second follows a tack-down stitch so the fabric can be trimmed before the border runs. Skip a stop and the fabric either isn’t held in place or can’t be trimmed cleanly. This is the single biggest structural difference between the two file types.
Stitch Type Used for the Main Shape
Embroidery fills a shape with tatami or satin stitching, meaning thread covers every part of it. Applique fills the same shape with fabric and only stitches a placement line, a tack-down line, and a satin border around the edge. A 6-inch solid letter built as embroidery can run 20,000 stitches or more. The same letter as applique often drops under 4,000. For the full range of stitch types a file might mix, the embroidery file format guide covers how different formats store that stitch data once the file is built.
Underlay Approach
Embroidery underlay stabilizes the whole shape before the top stitching runs, since thread alone has nothing else holding it flat. Applique underlay only needs to stabilize the placement and border area, since the fabric itself covers the interior. Less underlay is needed overall, but it has to be precise, because a weak tack-down line lets the fabric shift before the border locks it down.
Stitch Count and Machine Time
Lower stitch count on applique means faster machine runs on large designs. That’s the main production advantage. It’s not automatic, though. A hybrid file with embroidered detail stitched on top of the fabric can end up with a similar stitch count to straight embroidery once the detail work is added back in.
Why a Design Looks Different Depending on Which One Digitizes It
Here’s the thing most comparisons skip. Two files built from the same artwork don’t just differ in construction. They read differently once they’re on the garment.
Solid embroidery fill has a slightly raised, textured look, since thread sits in layers. Applique lies close to flat, since fabric is doing the visual work and thread only frames it. On a large letter or a bold mascot shape, that flatness usually looks cleaner. On fine detail, small text, or gradient-style shading, embroidery wins outright because applique physically cannot follow a curve that tight with a fabric edge.
Applique vs Embroidery: File Build Comparison
When a Digitizer Recommends Switching Techniques
A digitizer will flag a switch in either direction once the artwork audit is done. A large jacket-back letter submitted for straight embroidery often gets a note suggesting applique instead, since the stitch count and machine time drop sharply with no visible quality loss on a bold shape. Going the other way, a design with fine internal detail submitted for applique usually gets flagged because a fabric edge can’t hold a tight curve the way a satin column can. The three-layer sequence every applique file needs is worth reviewing if you’re deciding which route fits your design before you submit it.
What Happens If You Use the Wrong Technique for the Design
Forcing a fine, detailed logo into applique produces a fabric edge that can’t follow the interior curves, so the digitizer ends up simplifying the shape until it barely resembles the original. Forcing a large bold shape into straight embroidery isn’t wrong exactly, but it wastes machine time and thread on a shape that would look just as clean, and finish faster, as fabric and a border. Neither mistake breaks the file outright. Both waste money or flatten the design more than necessary.
What You’re Actually Paying For in Either File
The fee covers the same core work regardless of which technique the file uses:
- Manual digitizing by hand, not run through auto-digitizing software
- Correct stitch sequencing, including machine stops where applique requires them
- Underlay and density set for the fabric type you specify
- Delivery in your required machine format
- Free edits if the first version doesn’t sew the way you expected
How to Tell Your Digitizer Which One You Want
- Say the technique upfront: embroidery, applique, or ask for a recommendation based on the design.
- Note the fabric you’ll use for the applique piece if that’s the route: felt, twill, or fleece all set underlay differently.
- Flag any fine detail or small text so the digitizer can tell you early if it won’t hold in applique.
- Confirm the finished size before digitizing starts. Stitch density and column widths are set for one specific size.
A Real Order, Broken Down
A youth sports league in Georgia needed a mascot logo for 40 varsity-style jackets. The original request was for standard embroidery at 8 inches across the back. The digitizer flagged the stitch count: over 22,000 stitches at that size, with a run time that would slow the whole batch.
The mascot’s body and lettering were rebuilt as applique using felt, with only the eyes and small facial details kept as embroidered elements on top. Stitch count dropped to under 6,000. The jackets ran in half the machine time, and the flatter felt body actually held up better across the coarser jacket back fabric than a dense embroidery fill would have.
Who Builds These Files
USA Digitizing Pro has built both embroidery and applique files from its Texas studio since 2015. Every file, regardless of technique, is built by a human digitizer rather than auto-digitizing software. The team backs its work with a money-back quality guarantee on any file that doesn’t sew correctly.
Choosing the Right File for Your Design
The applique vs embroidery digitizing difference comes down to what fills the shape and how the machine sequences the build. Thread alone for fine detail and small text. Fabric plus a border for bold letters and large fills. Tell your digitizer which one you want, or send the design and ask for a recommendation, and the file gets built around the right technique from the first stitch.
Frequently Asked Questions
Not automatically in digitizing fees, since both start at the same flat rate for small designs. Applique can be cheaper in production time and thread cost on large shapes, because fewer stitches means less machine time and less thread consumed per garment across a production run.
Yes, when the file is built correctly. A properly bordered applique piece with full fabric coverage and a well-placed satin edge holds up through normal washing. The weak point on any applique is the border, so a file with insufficient pull compensation there will fray sooner than a solid embroidery fill would.
Yes. Hybrid files are common for mascots and detailed crests. The fabric fills the main body as applique, and embroidered elements stitch on top of the fabric for eyes, fine linework, or small text that fabric alone can’t reproduce.
This almost always traces back to pull compensation on the border stitch. Thread tightens slightly during stitching and can pull the satin border away from the trimmed fabric edge by a fraction of a millimeter, which shows clearly on light fabric over a dark garment. The fix is in the digitizing file, not the machine settings.
Yes, with proper stabilizer. Stretch fabrics need cut-away backing under the garment to keep the design from distorting once the hoop releases. The cover stitch density also needs to run lower than it would on a stable woven fabric.
A single-layer applique design needs two stops: one after the placement stitch for fabric lay, one after the tack-down stitch for trimming. Multi-piece designs with several fabric layers add a full stop set per additional piece.
Not by simple conversion. The stitch logic is fundamentally different, so an applique version needs to be rebuilt from the original artwork with placement, tack-down, and border layers added in. Scaling or editing an embroidery file doesn’t produce a working applique sequence.
Felt is the most forgiving choice since it doesn’t fray and holds its shape under the border stitch. Cotton twill and woven polyester also work well for standard varsity-style lettering. Loosely woven or stretchy fabrics need extra prep, like heat-seal backing or stabilizer, before they hold up as an applique piece.
Sometimes, since lower stitch counts can mean a shorter build for very large designs. But applique files also require more sequencing decisions around machine stops, so a small applique piece isn’t necessarily faster to digitize than a small embroidery file of the same size.
Straight embroidery generally holds up marginally better in heavy commercial laundering, since there’s no fabric edge that can fray over time. A well-built applique border closes that gap significantly, but the seam between fabric and thread remains the point most likely to show wear first.
Follow Us

RELATED BLOGS
Craftsmanship in Embroidery Digitizing: What It Buys You.
Published October 2, 2026 | By USA Digitizing Pro Team Every digitizing provider on the internet claims craftsmanship, which makes the word.
The Secret Behind Embroidery Design Is Under the.
Published September 21, 2026 | By USA Digitizing Pro Team Ask a decorator why one garment came out clean and the next.